2. System setup
If you intend to follow along with the code presented in this book, we recommend you follow these setup instructions so that you will run into fewer technical issues.
2.1. The command-line interface
A command-line interface (CLI) is a text-based interface used to interact with your computer. We’ll be using a CLI for various tasks throughout this book. We’ll assume Mac and Linux users are using the “Terminal” and Windows users are using the “Anaconda Prompt” (which we’ll install in the next section) as a CLI.
2.2. Installing software
2.2.1. Installing Python
We recommend installing the latest version of Python via the Miniconda distribution by following the instructions in the Miniconda documentation. Miniconda is a lightweight version of the popular Anaconda distribution. If you have previously installed the Anaconda or Miniconda distribution feel free to skip to Section 2.2.2.
If you are unfamiliar with Miniconda and Anaconda, they are distributions of Python that also include the conda package and environment manager, and a number of other useful packages. The difference between Anaconda and Miniconda is that Anaconda automatically installs over 250 additional packages (many of which you might never use), while Miniconda is a much smaller distribution that comes bundled with just a few key packages; you can then install additional packages as you need them using the command conda install.
conda is a piece of software that supports the process of installing and updating software (like Python packages). It is also an environment manager which is the key function we’ll be using it for in this book. An environment manager helps you create “virtual environments” on your machine where you can safely install different packages and their dependencies in an isolated location. Installing all the packages you need in the same place (i.e., the system default location) can be problematic because different packages often depend on different versions of the same dependencies; as you install more packages, you’ll inevitably get conflicts between dependencies and your code will start to break. Virtual environments help you compartmentalize and isolate the packages you are using for different projects to avoid this issue. You can read more about virtual environments in the conda documentation. While alternative package and environment managers exist, we choose to use conda in this book because of its popularity, ease-of-use, and ability to handle any software stack (not just Python).
2.2.2. Install packaging software
Once you’ve installed the Miniconda distribution, ensure that Python and conda are up to date by running the following command at the command-line:
conda update --all
Then, use conda to install the two main pieces of software we’ll be using to help us create Python packages in this book:
poetry: software that will help us build our own Python packages; and,cookiecutter: software that will help us create packages from pre-made templates:
conda install -c conda-forge poetry cookiecutter
Note
You may also choose to install poetry and/or cookiecutter using alternative tools that you’re familiar with, such as pip, but be sure to properly manage your virtual environments.
2.3. Register for a PyPI account
The Python Package Index (PyPI) is the official online software repository for Python. A software repository is a storage location for downloadable software, like Python packages. In this book we’ll be publishing a package to PyPI. Before publishing packages to PyPI, it is typical to “test drive” their publication on TestPyPI which is a test version of PyPI. To follow along with this book, you should register for a TestPyPI account on the TestPyPI website and a PyPI account on the PyPI website.
2.4. Set up Git and GitHub
If you’re not using a version control system, we highly recommend you get into the habit! A version control system tracks changes to the file(s) of your project in a clear and organized way (no more “document_1.doc”, “document_1_new.doc”, “document_final.doc”, etc.). As a result, a version control system contains a full history of all the revisions made to your project which you can view and retrieve at any time. You don’t need to use or be familiar with version control to read this book, but if you’re serious about creating Python packages, version control will become an invaluable part of your workflow, so now is a good time to learn!
There are many version control systems available, but the most common is Git and we’ll be using it throughout this book. You can download Git by following the instructions in the Git documentation. Git helps track changes to a project on a local computer, but what if we want to collaborate with others? Or, what happens if your computer crashes and you lose all your work? That’s where GitHub comes in. GitHub is one of many online services for hosting Git-managed projects. GitHub helps you create an online copy of your local Git repository which acts as a back-up of your local work and allows others to easily and transparently collaborate on your project. You can sign up for a free GitHub account on the GitHub website.
Attention
This book assume that those who choose to follow the optional version control sections of this book have basic familiarity with Git and GitHub (or equivalent). Two excellent learning resources are Happy Git and GitHub for the useR2 and Research Software Engineering with Python: Using Git at the Command Line3.
2.5. Python integrated development environments
A Python integrated development environment (IDE) will make the process of creating Python packages significantly easier. An IDE is a piece of software that provides advanced functionality for code development such as directory and file creation and navigation, autocomplete, debugging, and syntax highlighting, to name a few. An IDE will save you time and help you write better code. Commonly used free Python IDEs include Visual Studio Code, Atom, Sublime Text, Spyder, and PyCharm Community Edition. For those more familiar with the Jupyter ecosystem, JupyterLab is a suitable browser-based IDE. Finally, for the R community, the RStudio IDE also supports Python.
You’ll be able to follow along with the examples presented in this book regardless of what IDE you choose to develop your Python code in. If you don’t know which IDE to use, we recommend starting with Visual Studio Code. Below we briefly describe how to set up Visual Studio Code, JupyterLab, and RStudio as Python IDEs (these are the IDEs we personally use in our day-to-day work).
2.5.1. Visual Studio Code
You can download Visual Studio Code (VS Code) from the Visual Studio Code website. Once you’ve installed VS Code, you should install the “Python” extension from the VS Code Marketplace. To do this, follow the steps listed below and illustrated in Fig. 2.1:
Open the Marketplace by clicking the Extensions tab on the VS Code activity bar;
Search for “Python” in the search bar;
Select the extension named “Python” and then click Install.
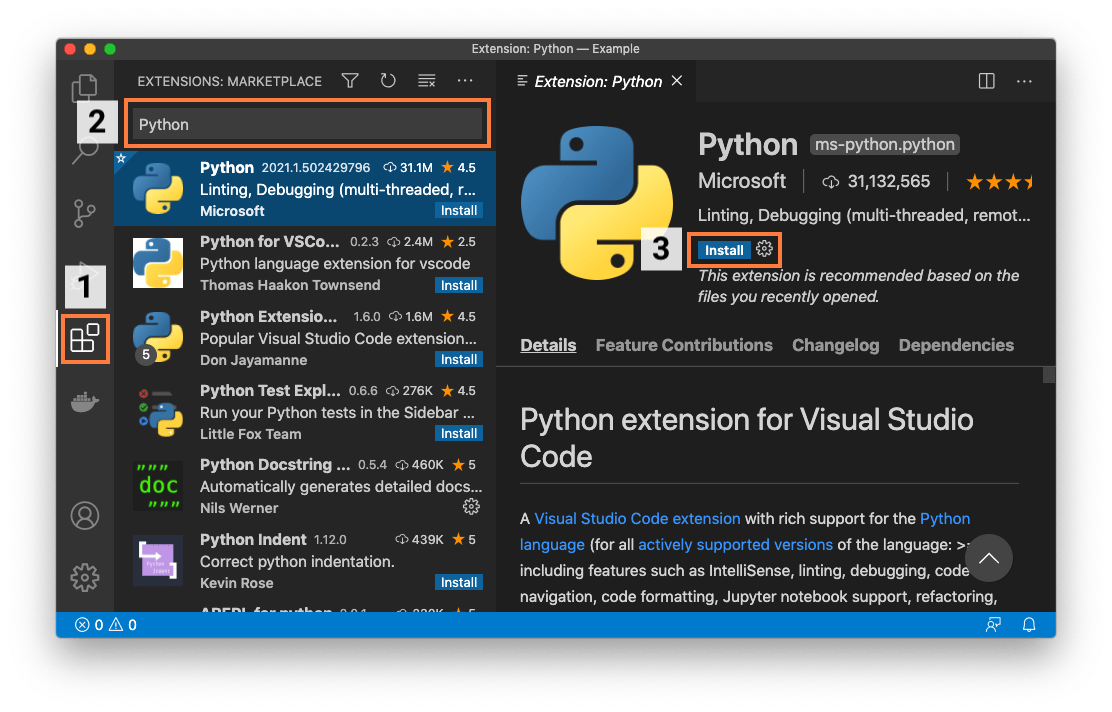
Fig. 2.1 Installing the Python extension in Visual Studio Code.
Once this is done, you have everything you need to start creating packages! For example, you can create files and directories from the File Explorer tab on the VS Code activity bar and you can open up an integrated CLI by selecting Terminal from the View menu. Fig. 2.2 shows an example of executing a Python .py file from the command line in VS Code.
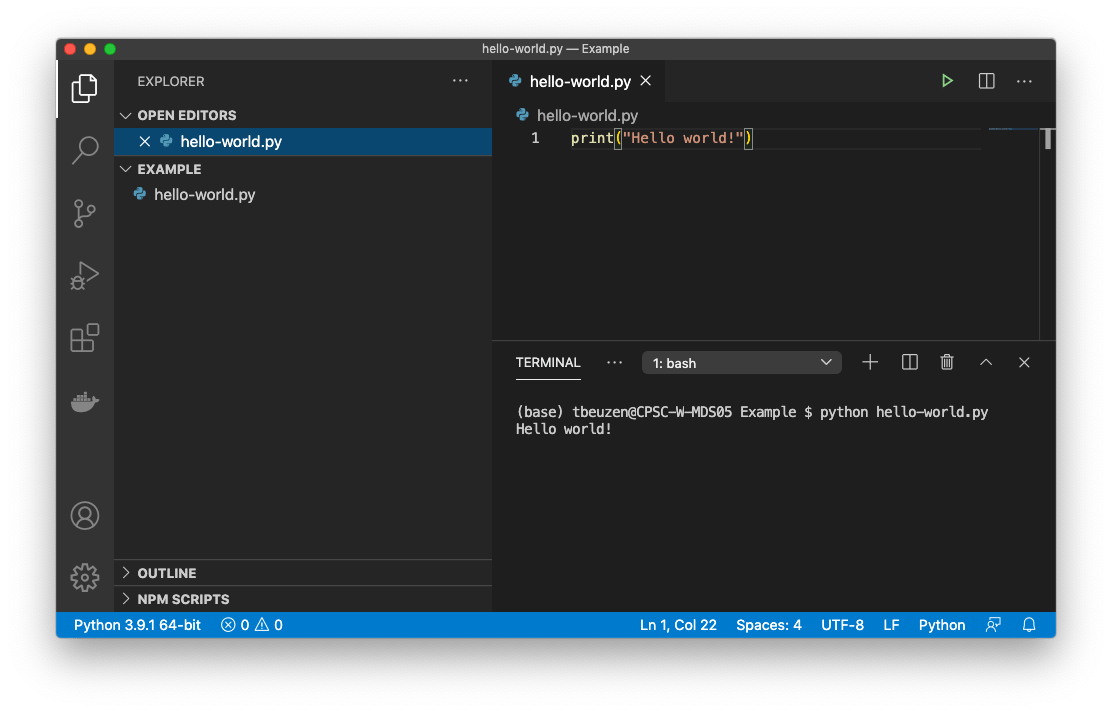
Fig. 2.2 Executing a simple Python file called hello-world.py from the integrated terminal in Visual Studio Code.
We recommend you take a look at the VS Code Getting Started Guide to learn more about using VS Code. While you don’t need to install any additional extensions to start creating packages in VS Code, there are many extensions available that can support and streamline your programming workflows in VS Code. Below are a few we recommend installing to support the workflows we use in this book (you can search for and install these from the “Marketplace” as we did earlier):
Python Docstring Generator: an extension to quickly generate documentation strings (docstrings) for Python functions.
Markdown All in One: an extension that provides keyboard shortcuts, automatic table of contents, and preview functionality for Markdown files. Markdown is a plain-text markup language that we’ll use and learn about in this book.
markdownlint: an extension that enables automatic style checking of Markdown files.
2.5.2. JupyterLab
For those comfortable in the Jupyter ecosystem feel free to stay there to create your Python packages! JupyterLab is a browser-based IDE that supports all of the core functionality we need to create packages. As per the JupyterLab installation instructions, you can install JupyterLab with:
conda install -c conda-forge jupyterlab
Once installed, you can launch JupyterLab from your current directory by typing the following command in your terminal:
jupyter lab
In JupyterLab, you can create files and directories from the File Browser and can open up an integrated terminal from the File menu. Fig. 2.3 shows an example of executing a Python .py file from the command line in JupyterLab.
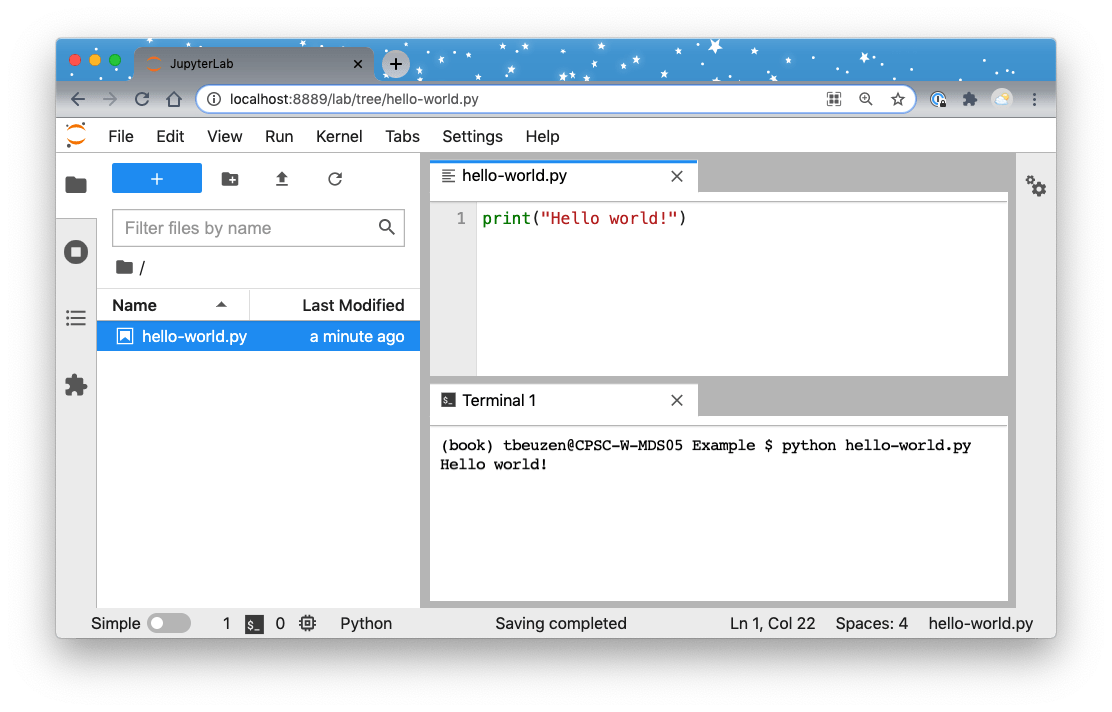
Fig. 2.3 Executing a simple Python file called hello-world.py from a terminal in JupyterLab.
We recommend you take a look at the JupyterLab documentation to learn more about how to use Jupyterlab. In particular, we’ll note that, like VS Code, JupyterLab supports an ecosystem of extensions that can add additional functionality to the IDE. We won’t install any here, but you can browse them in the JupyterLab Extension Manager if you’re interested.
2.5.3. RStudio
Users with an R background may prefer to stay in the RStudio IDE. We recommend installing the most recent version of the IDE from the RStudio website (we recommend installing at least version ^1.4) and then installing the most recent version of R from CRAN. To use Python in RStudio, you will need to install the reticulate R package by typing the following in the R console inside RStudio:
install.packages("reticulate")
When installing reticulate, you may be prompted to install the Anaconda distribution. We already installed the Miniconda distribution of Python in Section 2.2.1, so answer “no” to this prompt. Before being able to use Python in RStudio, you will need to configure reticulate. We will briefly describe how to do this for different operating systems below, but encourage you to look at the reticulate documentation for more help.
Mac and Linux
Find the path to the Python interpreter installed with Miniconda by typing
which pythonat the command line;Open (or create) an
.Rprofilefile in your HOME directory and add the lineSys.setenv(RETICULATE_PYTHON = "path_to_python"), where"path_to_python"is the path identified in step 1;Open (or create) a
.bash_profilefile in your HOME directory and add the lineexport PATH="/opt/miniconda3/bin:$PATH", replacing/opt/miniconda3/binwith the path you identified in step 1 but without thepythonat the end.Restart R.
Try using Python in RStudio by running the following in the R console:
library(reticulate)
repl_python()
Windows
Find the path to the Python interpreter installed with Miniconda by opening an Anaconda Prompt from the Start Menu and typing
where pythonin a terminal;Open (or create) an
.Rprofilefile in your HOME directory and add the lineSys.setenv(RETICULATE_PYTHON = "path_to_python"), where"path_to_python"is the path identified in step 1. Note that in Windows, you need\\instead of\to separate the directories; for example your path might look like:C:\\Users\\miniconda3\\python.exe;Open (or create) a
.bash_profilefile in your HOME directory and add the lineexport PATH="/opt/miniconda3/bin:$PATH", replacing/opt/miniconda3/binwith the path you identified in step 1 but without thepythonat the end.Restart R.
Try using Python in RStudio by running the following in the R console:
library(reticulate)
repl_python()
Fig. 2.4 shows an example of executing Python code interactively in RStudio.
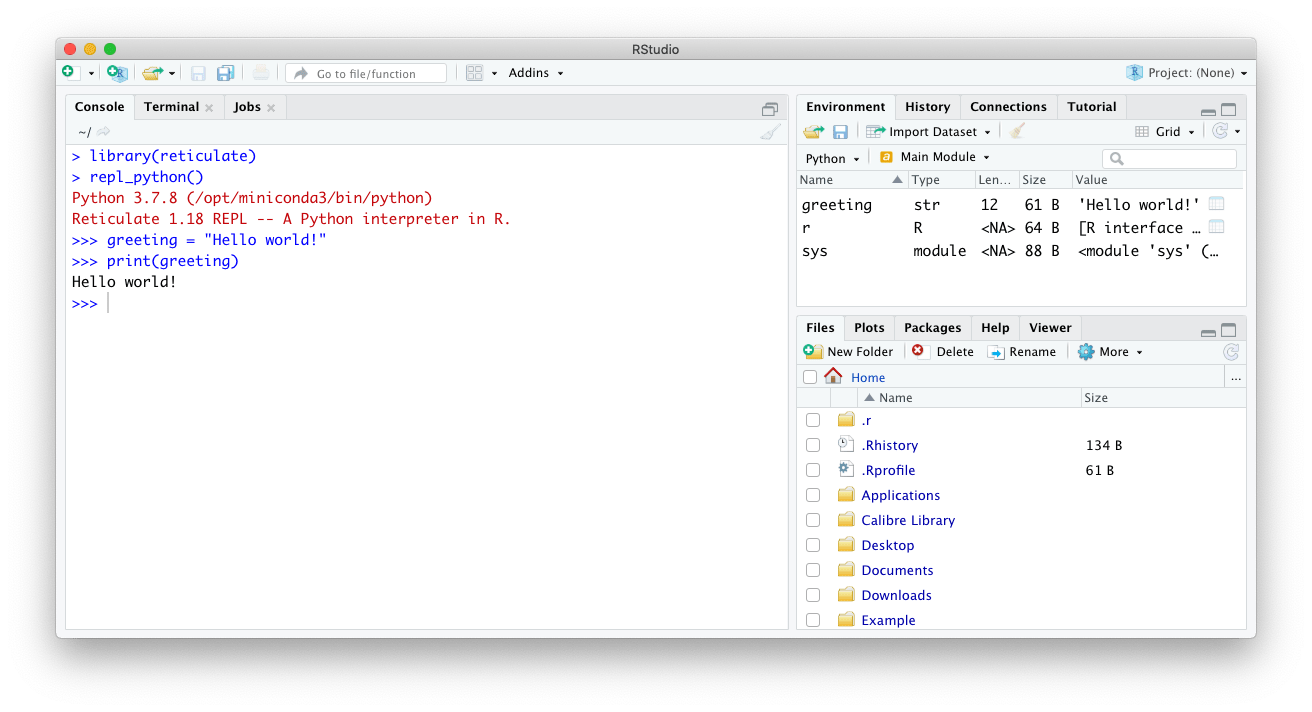
Fig. 2.4 Executing Python code in RStudio.